AWS Teams Installation Guide
This guide describes how to install, operate, administer, and configure the Katonic Platform in your own AWS Kubernetes cluster. This content applies to Katonic users with self-installation licenses.
Hardware Configurations
A scalable cluster implementation that is composed of a standard set of master nodes, a set of worker nodes dedicated to hosting Katonic platform services, and a set of worker nodes dedicated to hosting compute workloads. This configuration is designed to achieve superior performance that enables real-time execution of analytics, machine learning (ML), and artificial intelligence (AI) applications in a production pipeline.
Katonic on EKS
Katonic can run on a Kubernetes cluster provided by AWS Elastic Kubernetes Service. When running on EKS, the Katonic architecture uses AWS resources to fulfill the Katonic MLOps platform requirements as follows:
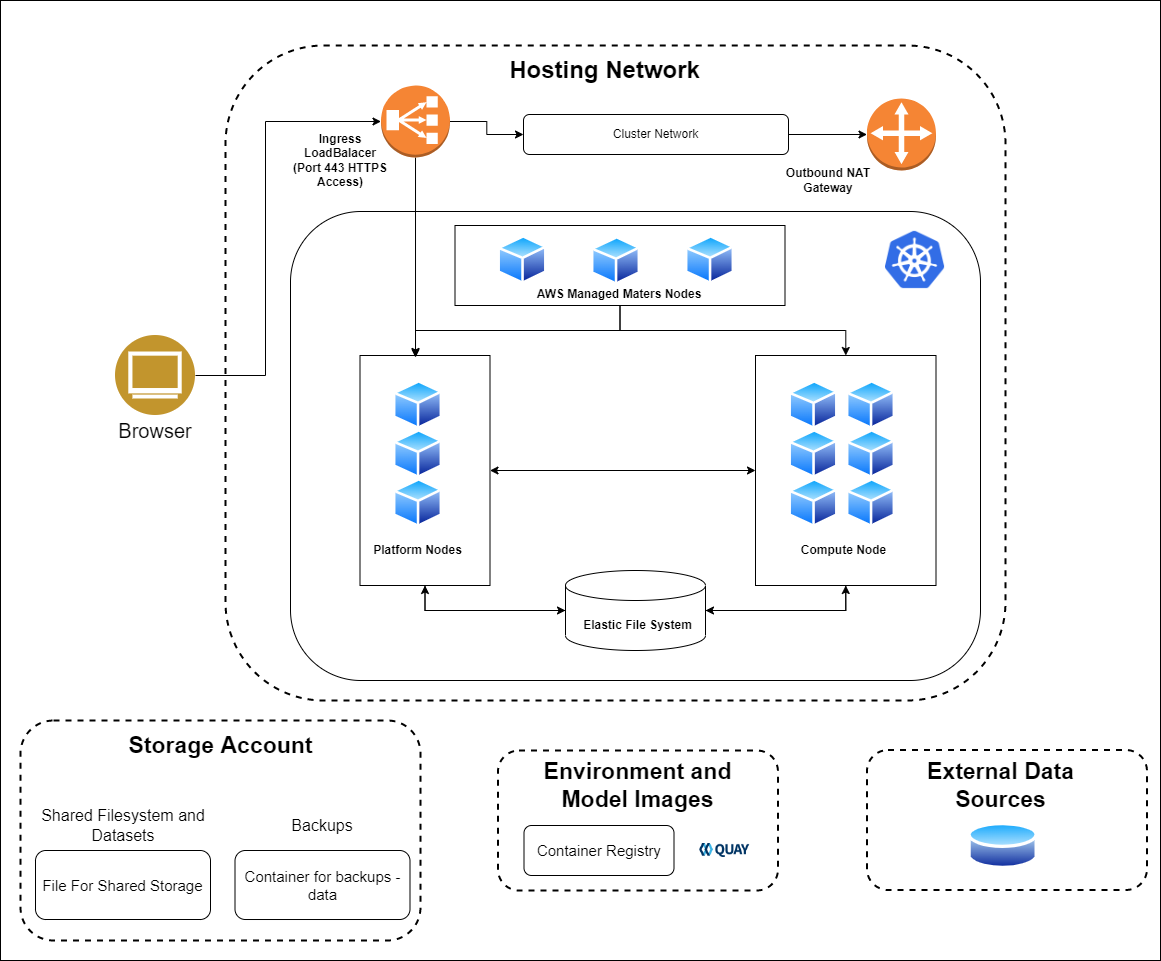
Kubernetes control moves to the EKS control plane with managed Kubernetes masters
Katonic uses a dedicated Auto Scaling Group (ASG) of EKS workers to host the Katonic platform
ASGs of EKS workers host elastic compute for Katonic executions
AWS S3 is used to store entire platform backups.
AWS EFS is used to store Katonic Datasets
The kubernetes.io/aws-ebs provisioner is used to create persistent volumes for Katonic executions
Calico is used as a network plugin to support Kubernetes network policies
Katonic cannot be installed on EKS Fargate, since Fargate does not support stateful workloads with persistent volumes.
Instead of EKS Managed Node groups, Katonic recommends creating custom node groups to allow for additional control and customized Amazon Machine Images. Katonic recommends eksctl, Terraform, or CloudFormation for setting up custom node groups.
All nodes in such a deployment have private IPs, and internode traffic is routed by the internal load balancer. Nodes in the cluster can optionally have egress to the Internet through a NAT gateway.
All AWS services listed previously are required except GPU compute instances, which are optional.
Your annual Katonic license fee will not include any charges incurred from using AWS services. You can find detailed pricing information for the Amazon services listed above at (https://aws.amazon.com/pricing.)
Set up an EKS cluster for Katonic
This section describes how to configure an Amazon EKS cluster for use with Katonic. When configuring an EKS cluster for Katonic, you must be familiar with the following AWS services:
Elastic Kubernetes Service (EKS)
Identity and Access Management (IAM)
Virtual Private Cloud (VPC) Networking
Elastic Block Store (EBS)
Elastic File System (EFS)
S3 Object Storage
Additionally, a basic understanding of Kubernetes concepts like node pools, network CNI, storage classes, autoscaling, and Docker will be useful when deploying the cluster.
Security considerations
You must create IAM policies in the AWS console to provision an EKS cluster. Katonic recommends following the standard security practice of granting the least privilege when you create IAM policies. Begin with the least privileges and then grant elevated privileges when necessary. See information about the grant least privilege concept
IAM permissions for user
The list of permissions required for a user in AWS to carry out the installation.
katonic-platform-installation-aws-services-permission-policy
Additionally, for backups you need to add the policy provided below in BLOB Storage part of the documentation.
Service quotas
Amazon maintains default service quotas for each of the services listed previously. You can check the default service quotas and manage your quotas by logging in to the AWS Service Quotas console.
Network plugin
Katonic relies on Kubernetes network policies to manage secure communication between pods in the cluster. Network policies are implemented by the network plugin, so your cluster uses a networking solution that supports NetworkPolicy, such as Calico.
See the AWS documentation on installing Calico for your EKS cluster.
If you use the Amazon VPC CNI for networking, with only NetworkPolicy enforcement components of Calico, you must ensure the subnets you use for your cluster have CIDR ranges of sufficient size, as every deployed pod in the cluster will be assigned an elastic network interface and consume a subnet address. Katonic recommends at least a /23 CIDR for the cluster.
Dynamic block storage
The EKS cluster must be equipped with an EBS-backed storage class that Katonic will use to provision ephemeral volumes for user execution. GP2 and GP3 volume types are supported. See the following for an example storage class specification:
apiVersion: storage.k8s.io/v1
kind: StorageClass
metadata:
  name: gp2
parameters:
  fsType: ext4
  type: gp2
provisioner: kubernetes.io/aws-ebs
reclaimPolicy: Delete
volumeBindingMode: WaitForFirstConsumer
When using GP3, your IAM policy must allow additional permissions to operate on these ephemeral volumes. Use this example IAM policy as a reference.
Datasets storage
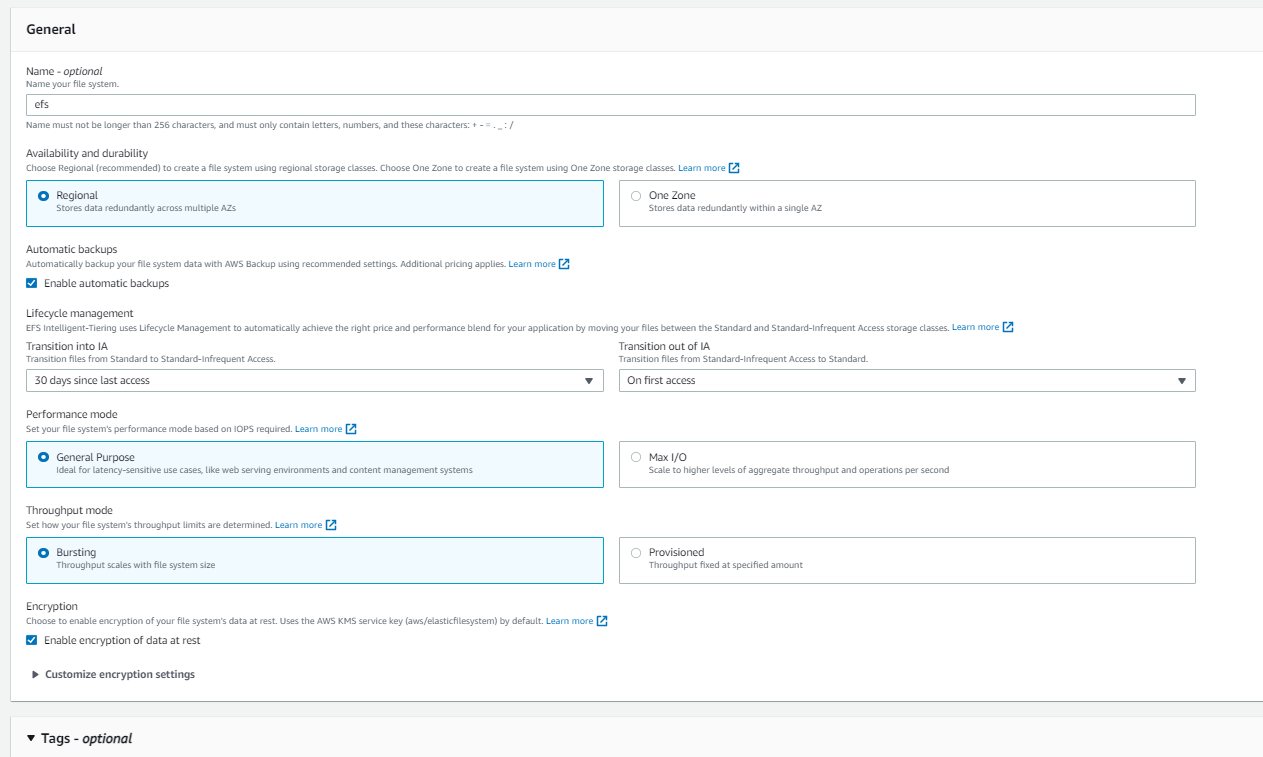
The EFS file system must be provisioned and an access point configured to allow access from the EKS cluster.
Katonic Installer has an optional parameter shared_storage.create to create AWS Elastic File System.
Here’s how Katonic configures access points with the following key parameters, also shown in the following image.
Blob storage
When running in EKS, Katonic can use Amazon S3 for durable object storage.
Create 1 bucket for storing entire platform backups. The IAM user account that will carry out the installation must have access to this bucket.
Configure each bucket to permit read and write access from the EKS cluster. This involves applying an IAM policy to the nodes in the cluster like the following:
{
    "Version": "2012-10-17",
    "Statement": [
        {
            "Sid": "VisualEditor0",
            "Effect": "Allow",
            "Action": [
                "s3:ListAllMyBuckets",
                "s3:GetBucketLocation"
            ],
            "Resource": "*"
        },
        {
            "Sid": "VisualEditor1",
            "Effect": "Allow",
            "Action": "s3:ListBucket",
            "Resource": "arn:aws:s3:::<backup-bucket-name>"
        },
        {
            "Sid": "VisualEditor2",
            "Effect": "Allow",
            "Action": [
                "s3:PutObject",
                "s3:GetObject",
                "s3:DeleteObject"
            ],
            "Resource": "arn:aws:s3:::<backup-bucket-name>/*"
        }
    ]
}
Record the name of the bucket for use when installing Katonic.
Autoscale access
If you intend to deploy the Kubernetes Cluster Autoscaler in your cluster, the instance profile used by your platform nodes must have the necessary AWS Auto Scaling permissions.
See the following example policy:
{
 "Version": "2012-10-17",
 "Statement": [
     {
         "Action": [
             "autoscaling:DescribeAutoScalingGroups",
             "autoscaling:DescribeAutoScalingInstances",
             "autoscaling:DescribeLaunchConfigurations",
             "autoscaling:DescribeTags",
             "autoscaling:SetDesiredCapacity",
             "autoscaling:TerminateInstanceInAutoScalingGroup",
             "ec2:DescribeLaunchTemplateVersions",
             "ec2:DescribeInstanceTypes"
        ],
         "Resource": "*",
         "Effect": "Allow"
     }
]
}
Domain
Katonic must be configured to serve from a specific FQDN. To serve Katonic securely over HTTPS, you will also need an SSL certificate that covers the chosen name. Record the FQDN for use when installing Katonic.
Calculating Required Infrastructure Resources (AWS) Allocated Infrastructure Resources
When the platform is installed, it creates the following resources. Take this into account when selecting your installation configuration.
| Type | Amount | When | Notes | |
|---|---|---|---|---|
| 1 | Classic Elastic Load Balancer | 1 | Always | Only 1 is required. Automatically gets created by EKS when required. |
| 2 | Network interface | 1 per node | Always | |
| 3 | OS boot disk (AWS EBS ) | 1 per node | Always | |
| 4 | Public IP address | 1 per node | The platform has public IP addresses. | |
| 5 | VPC | 1 | The platform is deployed to a new VPC. | |
| 6 | Security group | 1 | Always | See Security Groups Configuration (AWS). |
| 7 | EKS Cluster | 1 | EKS is used as the application cluster |
Node pools
The EKS cluster must have at least two ASGs that produce worker nodes with the following specifications and distinct node labels, and it might include an optional GPU pool:
| Pool | Min-Max | Instance | Labels | Taints | |
|---|---|---|---|---|---|
| 1 | platform | 2-4 | m5.xlarge | katonic.ai/node-pool=platform | katonic.ai/node-pool=platform:NoSchedule |
| 2 | compute | 1-20 | m5.2xlarge | katonic.ai/node-pool=compute | |
| 3 | Optional: gpu | 0-5 | p2.xlarge | katonic.ai/node-pool=gpu | katonic.ai/node-pool=gpu:NoSchedule |
If you want Katonic to run with some components deployed as highly available ReplicaSets you must use 3 availability zones. All compute node pools you use must have corresponding ASGs in any AZ used by other node pools. Setting up an isolated node pool in one zone can cause volume affinity issues.
To run the node pools across multiple availability zones, you will need duplicate ASGs in each zone with the same configuration, including the same labels, to ensure pods are delivered to the zone where the required ephemeral volumes are available.
The easiest way to get suitable drivers onto GPU nodes is to use the EKS-optimized AMI distributed by Amazon as the machine image for the GPU node pool.
Additional ASGs with distinct katonic.ai/node-pool labels can be added to make other instance types available for Katonic executions.
AWS Platform-Node Specifications
Platform nodes in platform AWS cloud deployments must fulfill the following hardware specification requirements according to the deployment type:
| Component | Specification |
|---|---|
| Node count | min 2 |
| Instance type | m5.xlarge |
| vCPUs | 4 |
| Memory | 16 GB |
AWS Compute-Node Specifications
Compute nodes in platform AWS cloud deployments must use one of the following instance types; choose the type that best fits your requirements. AWS Elastic Kubernetes Service (EKS) is also supported for application nodes, using the instance types listed below. For specification details for each type, refer to the AWS documentation.
Note
Supported compute node configurations
m5.2xlarge (default configuration)
m5.4xlarge
m5.8xlarge
m5.12xlarge
p2.xlarge (default configuration)
Additional node pools with distinct katonic.ai/node-pool labels can be added to make other instance types available for Katonic executions.
Katonic Platform Installation
Completion Time
General completion time: 1 hour
Installation process
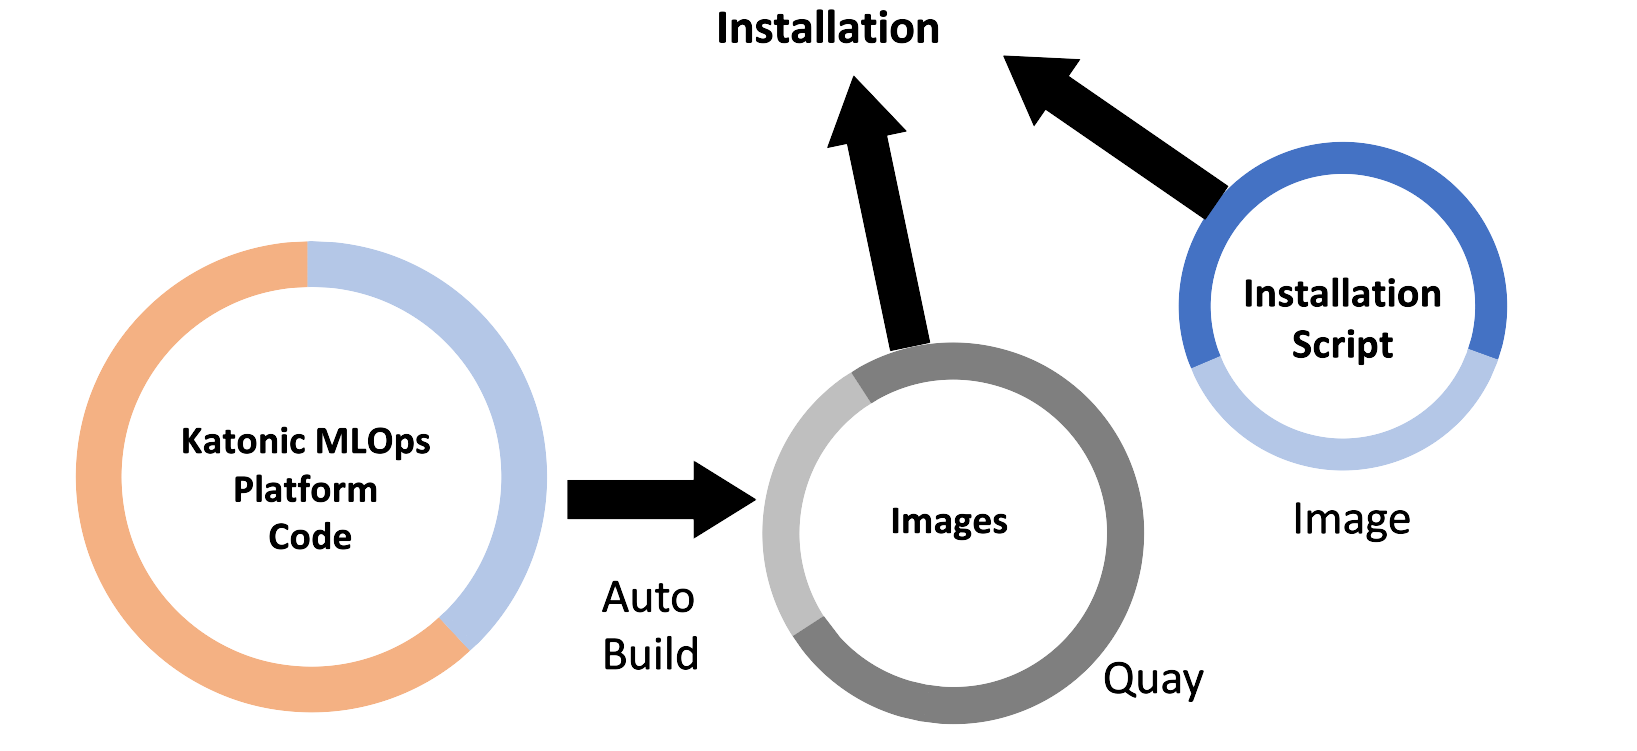
The Katonic platform runs on Kubernetes. To simplify the deployment and configuration of Katonic services, Katonic provides an install automation tool called the katonic-installer that will deploy Katonic into your compatible cluster. The katonic-installer is an ansible role delivered in a Docker container and can be run locally.
Prerequisites
To install and configure Katonic in your AWS account you must have:
quay.io credentials from Katonic.
Required: PEM encoded public key certificate for your domain and private key associated with the given certificate.
AWS region with enough quota to create:
At least 4 m5.2xlarge EC2 machines.
p2.xlarge or greater (All P instances) VMs, if you want to use GPU.
A Linux-based machine with the following:
a. A Linux-based machine having 4GB RAM and 2vcpus. Skip to step b if you already have the machine with the given specifications. TIP: After the platform is deployed successfully, the VM can be deleted.
b. Switch to the root user inside the machine.
c. AWS CLI must be installed and logged in to your AWS account using aws configure command, with a user that has IAM policies required to create resources listed above.
Commands for installing AWS CLI v2.
curl "https://awscli.amazonaws.com/awscli-exe-linux-x86_64.zip" -o "awscliv2.zip"
unzip awscliv2.zip
sudo ./aws/install
The following are installed:
The Katonic Installer can deploy the Katonic MLOps platform in two ways:
Creating EKS and deploying Katonic MLOps Platform
Deploying Katonic MLOps platform on existing EKS(requirements must be satisfied)
Teams
- Install Katonic Platform with AWS Elastic Kubernetes Service Log in to Quay with the credentials described in the requirements section above.
docker login quay.io
- Retrieve the Katonic installer image from [Quay](http://quay.io .)
docker pull quay.io/katonic/katonic-installer:v3.3.0
- Create a directory.
mkdir katonic
cd katonic
Put the PEM encoded public key certificate (having extension .crt) for your domain and private key associated with the given certificate(having extension .key) inside the current directory(katonic).
Initialize the installer application to generate a template configuration file named katonic.yml. Note: supported values for license type are community, teams and enterprise.
docker run -it --rm --name generating-yaml -v $(pwd):/install quay.io/katonic/katonic-installer:v3.3.0 init aws teams
Edit the configuration file with all necessary details about the target cluster, storage systems, and hosting domain. Read the following configuration reference:
| Parameter | Description | Value | |
|---|---|---|---|
| 1 | license_type | Katonic MLOps platform can be installed in either POC or Operational(HA) mode | teams |
| 2 | deploy_on | Cluster to be deployed on | AWS |
| 3 | create_k8s_cluster | create EKS or not. Must be set False if EKS is already deployed | True or False |
| 4 | cluster_name | Cluster name to be | eg. katonic-mlops-platform-v3-3 |
| 5 | aws_region | AWS region name | eg. us-east-1 |
| 6 | deployment_type | type of the deployment | POC or Operational |
| 7 | autoscaler | enabling of the autoscaler | True or False |
| 8 | platform_nodes.instance_type | Platform node VM size | eg. m5.xlarge |
| 9 | platform_nodes.min_count | Minimum number of platform nodes | eg. 2 |
| 10 | compute_nodes.instance_type | Compute node VM size | eg. m5.2xlarge |
| 11 | compute_nodes.min_count | Minimum number of compute nodes | eg. 1 |
| 12 | gpu_enabled | Add GPU nodepool | True or False |
| 13 | gpu_nodes.instance_type | gpu node VM size | eg. p2.xlarge |
| 14 | gpu_nodes.min_count | Minimum number of gpu nodes | eg. 1 |
| 15 | shared_storage.create | create EFS | True or False |
| 16 | backup_enabled | enabling of the backup | True or False |
| 17 | s3_bucket_name | name of the s3 bucket | |
| 18 | s3_bucket_region | region of the s3 bucket | |
| 19 | backup_schedule | scheduling of the backup | "@every 24h" |
| 20 | backup_expiration | expiration of the backup | 2160h0m0s |
| 21 | use_custom_domain | Set this to True if you want to host katonic platform on your custom domain. Skip if use_katonic_domain: True | True or False |
| 22 | custom_domain_name | Expected a valid domain. | eg. katonic.tesla.com |
| 23 | use_katonic_domain | Set this to True if you want to host katonic platform on Katonic MLOps Platform domain. Skip if use_custom_domain: True | True or False |
| 24 | katonic_domain_prefix | One word expected with no special characters and all small alphabets | eg. tesla |
| 25 | quay_username | ||
| 26 | quay_password | ||
| 27 | adminUsername | email for admin user | eg. john@katonic.ai |
| 28 | adminPassword | password for admin user | at least 1 special character at least 1 upper case letter at least 1 lower case letter minimum 8 characters |
| 29 | adminFirstName | Admin first name | eg. john |
| 30 | adminLastName | Admin last name | eg. musk |
Installing Katonic MLOps Platform
docker run -it --rm --name install-katonic -v /root/.aws:/root/.aws -v $(pwd):/inventory quay.io/katonic/katonic-installer:v3.3
2. Install Katonic Platform on existing AWS Elastic Kubernetes Service
The steps are similar to Install Katonic Platform with AWS Elastic Kubernetes Service. Just edit the configuration file with all necessary details about the target cluster, storage systems, and hosting domain. Read the following configuration reference, these are the only parameters required when installing the Katonic MLOps platform on existing EKS.
| Parameter | Description | Value | |
|---|---|---|---|
| 1 | license_type | Katonic MLOps platform can be installed in either POC or Operational(HA) mode | teams |
| 2 | deploy_on | Cluster to be deployed on | AWS |
| 3 | create_k8s_cluster | Create EKS or not. Must be set False if EKS is already deployed | True or False |
| 4 | shared_storage.create | Create EFS | True or False |
| 5 | backup_enabled | Enabling of the backup | True or False |
| 6 | backup_schedule | scheduling of the backup | "@every 24h" |
| 7 | backup_expiration | expiration of the backup | 2160h0m0s |
| 8 | use_custom_domain | Set this to True if you want to host katonic platform on your custom domain. Skip if use_katonic_domain: True | True or False |
| 9 | custom_domain_name | Expected a valid domain. | eg. katonic.tesla.com |
| 10 | use_katonic_domain | Set this to True if you want to host katonic platform on Katonic MLOps Platform domain. Skip if use_custom_domain: True | True or False |
| 11 | katonic_domain_prefix | One word expected with no special characters and all small alphabets | eg. tesla |
| 12 | quay_username | ||
| 13 | quay_password | ||
| 14 | adminUsername | email for admin user | eg. john@katonic.ai |
| 15 | adminPassword | password for admin user | at least 1 special character at least 1 upper case letter at least 1 lower case letter minimum 8 characters |
| 16 | adminFirstName | Admin first name | eg. john |
| 17 | adminLastName | Admin last name | eg. musk |
Installing Katonic MLOps Platform
docker run -it --rm --name install-katonic -v /root/.kube:/root/.kube -v $(pwd):/inventory quay.io/katonic/katonic-installer:v3.3.0
Installation Verification
The installation process can take up to 45 minutes to fully complete. The installer will output verbose logs, and commands to take kubectl access of deployed cluster and surface any errors it encounters. After installation, you can use the following commands to check whether all applications are in a running state or not.
kubectl get pods --all-namespace
This will show the status of all pods being created by the installation process. If you see any pods enter a crash loop or hang in a non-ready state, you can get logs from that pod by running:
kubectl logs $POD_NAME --namespace $NAMESPACE_NAME
If the installation completes successfully, you should see a message that says:
TASK [platform-deployment : Credentials to access Katonic MLOps Platform] *******************************ok: [localhost] => {
    "msg": [
        "Platform Domain: $domain_name",
        "Username: $adminUsername",
        "Password: $adminPassword"
    ]
}
However, the application will only be accessible via HTTPS at that FQDN if you have configured DNS for the name to point to an ingress load balancer with the appropriate SSL certificate that forwards traffic to your platform nodes.
Post-Installation steps
File Manager
kubectl rollout restart deploy minio-server
kubectl rollout status deploy minio-server
Test and troubleshoot
Run the following tests to verify that your Katonic installation was successful:
- Login to the Katonic application and that all the navigation panel options are operational.
Failure of this test means you must check that Keycloak was set up properly.
- Create a new project and launch a Jupyter/JupyterLab workspace.
Failure of this test means you must check that default environment images have been loaded in the cluster.
- Publish an app with flask or shiny apps.
Failure of this test means you must check that the environment images have flask and shiny installed.